A Guide To Managing Lightning Channels On Thunderhub

Managing channels on a lightning node can sometimes be difficult and confusing. Unfortunately, managing channels on a lightning node takes plenty of effort and does not fit a “fire and forget” strategy. This is why we’ve written this guide; it is in the hopes of easing any struggles you may have in managing your node. This guide will show you how to manage your channels for optimal efficiency in routing and in setting the relative fees. This guide assumes you’re using Thunderhub to manage your channels on your node, it also assumes that you have a basic understanding of the Lightning Network and how channels generally operate. Since there’s no right or wrong way of doing things, this guide is strictly based on the strategies used here at LNServer.com.
About This Guide
The biggest difficulty in lightning channel management is the amount of factors involved in determining a channel’s routing. There are hundreds, if not thousands, of factors that can affect routing traffic of sats through your channels. These can include: Number of channels, capacity, number of peers, good connectivity, node’s centrality, node’s hubness, reach, fees, availability of liquidity, capacity balances, amount of routing traffic and many more.
This guide aims at explaining the basic strategies used to get a starting handle on tackling all the factors mentioned above. In addition, this guide shows you how we, at LNServer manage our channels.
You are welcome to copy and redistribute this guide as it was always our goal to help the Bitcoin Lightning community. If you find this guide helpful, please consider zapping us. Our lightning address is: [email protected].
Setting Up Columns in The “Channels” Section
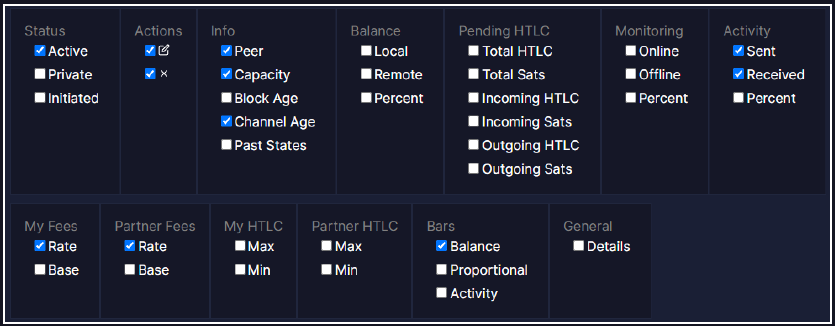
You will need to first set up your columns. Click on “Channels” in the left navigation menu to enter the channels management section. From there, click on the settings button on the right hand of the screen. You will arrive at something similar to the screenshot above.
You should select the following: Status:Active, Actions:Edit, Actions:Delete, Info:Peer, Info:Capacity, Info:Channel Age, Activity:Sent, Activity:Received, My Fees:Rate, Partner Fees:Rate and Bars:Balance.
We find this as the optimal setup of information about our channels.
Analyzing a Channel’s Routing Traffic
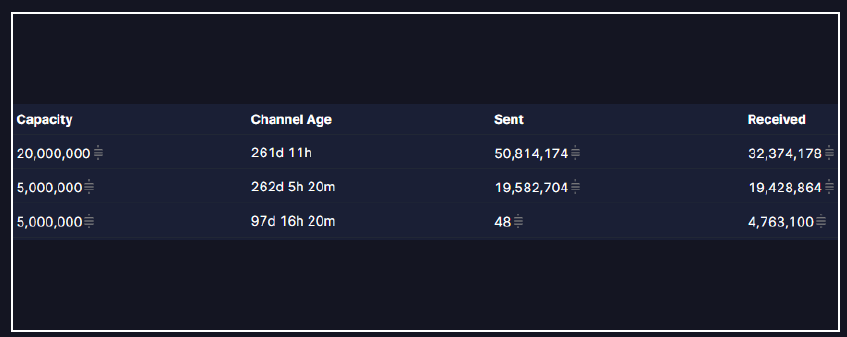
After setting up the columns the way we want from the previous section of this guide, we can see the flow of sats in our channels. The screen shot above shows three channels with capacities of 20 million sats, 5 million sats and 5 million sats respectively, which we will refer to as channels A, B and C.
Looking at Channel A, we see that it has sent about 50 million sats during its lifetime. In addition, it has received about 32 million sats. This is a 20 million sat capacity channel that was able to send 2.5x its capacity and receive 1.6x over its lifetime. So it’s safe to say this is a very active channel. This is especially true given its age.
Channel B fares a little bit better. Channel B has a capacity of 5 million sats but was able to send and receive almost 4x its capacity.
Channel C, on the other hand struggled in sending sats but received almost 1x its capacity. Inspecting the channel’s age, we see this is a newer channel so routing traffic could change in the future.
Finding New Nodes That Have Recently Connected To Your Node
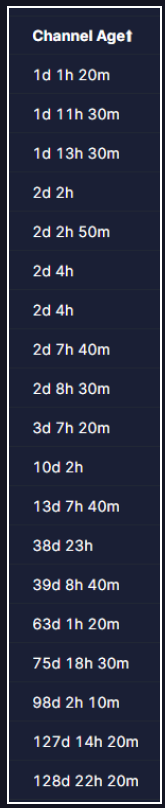
Sorting by age in an ascending manner reveals the latest channels opened either by your node or by your peer. These channels will appear towards the top of the “Channel’s” list.
Here, you will be able to find any new channel that was opened by another node. If you check on this daily, then you will be able to discover new opened channels within every 24 hour period.
Alternatively, sorting by age in a descending manner reveals your oldest channel(s) towards the top. Your oldest channel, if it was not closed previously, also shows your node’s age.
Balance Bars
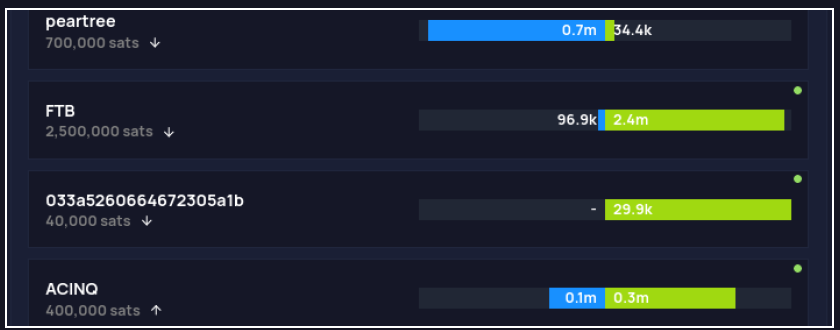
Balance bars are a visual representation of a channel’s state of liquidity. They show your channel’s liquidity represented by a cyan and green bar. The cyan part of the bar represents liquidity on your end while the green part represents the liquidity on the peer’s end.
If we take the first channel in the screenshot above that was opened from/to the node with the alias of “peartree” for example, we can see that most of the liquidity is on our end. If it was us who opened this channel, then we can deduce that a total of 34.4k stats have in fact been routed from our node to the peer (given the channel hasn’t been rebalanced previously). In this case, it will be convenient for us to send funds using this channel, but using it to receive will be limited to a maximum of 34.4k (for the time being).
We can also deduce that the channel’s total capacity is 734k sats.
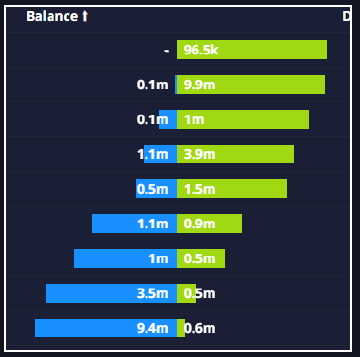
Having a few (or many) channels, with significant liquidity, all balancing each other such as the screenshot on the right, makes it easy for your node to both send and receive payments in general. This is because there is enough liquidity on both ends of the channels and one channel can receive while another sends.
Utilizing LNServer.com

One of our goals at LNServer.com is to help new nodes by providing quick, affordable and easy liquidity. New nodes often run into the problem of lacking incoming liquidity. This happens because it’s easy to fund a new channel and thus have the liquidity on your end, but liquidity on the opposite end (incoming liquidity) is difficult to set up. You will need to seek out other node operators and ask them to open a channel to your node. These node operators might not be interested, might not have the necessary funds, or are busy in general.
Our web app will quickly and cheaply get you started in obtaining incoming liquidity. Just visit https://LNServer.com and apply today. Our web form is extremely easy to use, and in addition, we have provided video tutorials on using our web app with your specific node, whether it’s an Umbrel, a Start9 or a RaspiBlitz. You can find all the tutorials at LNServer.com/tutorials.
Whether you use your node as a routing node or as a personal node, obtaining a channel from, or opening a channel to, one or all of our nodes will greatly improve your node’s performance and position. Additionally, our nodes are considered “in good health” by the Terminal Web and therefore will increase the rank of your node if we share a channel.
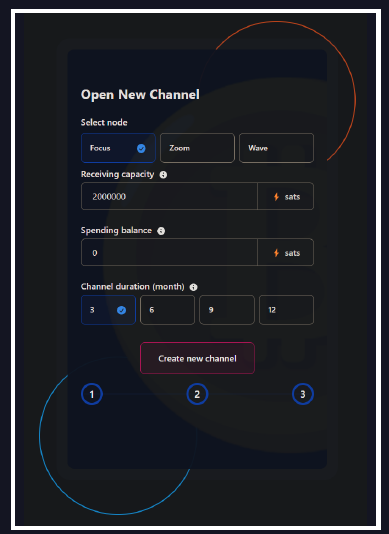
On our web app, simply:
- 1. Select the node you wish to receive liquidity from
- 2. Select the liquidity capacity
- 3. Select if you want outgoing liquidity as well
- 4. Select the duration of the liquidity channel
- 5. Click “Create new channel”